4.28.2016

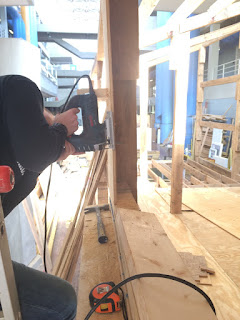
This is Adam Taylor- our Wood expert. He also happens to have access to this abnormally large saw, which we used to cut our 6.25" x 3.5" cants into 5/8" thick pieces of siding. Huge thanks to the volunteers who probably walked away from this work day bruised and exhausted.


The siding was cut in preparation for our wall experiment. Of course with typical construction all of the walls would be built simultaneously, but since this is a new process and we're first time Wall-Builders, we have restricted our learning experience to one portion of the cabin.


Here's the step by step on how we build a wall: 


1. Widen the rough opening to accommodate the new window


2. Apply vertical furring strips


3. Wrap, cut, and flash the opening


4. Insert the window


5. Apply horizontal furring strips


6. Slide in metal flashing above the window


7. Complete the pattern

And repeat!


2.18.2016

Green Oak "Continuance"

The first bent was dangerous.
The second bent was nerve-wracking.
The third, fourth, and fifth bents basically put themselves up. ...What really happened was Josh and Blake got into a rhythm of constructing and we enlisted our engineers to help with the raising.


Here we are today!
The team (most of it) has returned from the Holidays with a sense of satisfaction at a job well partially done and an eagerness to push forward with improvements.
The reviewers had some suggestions:
embracing construction methods
experiment with openings
increased natural light


10.07.2015

Design Build Studio

FIVE MONTHS LATER...the true test has begun.

5 studio + 3 seminar + 1 professor + 1 Jeremy = Green Oak Initiative Materialized.


Step Zero: deconstruct


Step One: get the wood

This was harder than we imagined. After weeks of phone calls to local sawmills, we started the telethon. Each of us was frantically googling sawmills in every surrounding state; we catalogued, pitched the Green Oak Initiative, and finally dropped our phones as soon as Hunter yelled "You all owe me drinks!" 


4:30pm Wednesday, September 23, the wood arrived from South Carolina. They told us we had three hours to unload and the clock began as soon as we cut the cants loose. By the time 7:30 rolled around we had sweat drenched t-shirts, several pinched fingers, a bundle of aching muscles, and most importantly we had the wood unloaded into the atrium of the Art+Architecture building. 

No more pretending. Now that we have the main ingredient, we need to build as quickly and carefully as possible because every day that wood shrinks a little bit, so does our window for construction.


Each 14'-16' member weighs in at about 150lbs wet. Thanks to Hunter Todd's home scale we know that one foot of a typical cant weighs exactly 9.85lbs right now.


Two weeks into building: two massive bents stand precariously upright before us. We've already encountered one casualty. Lesson learned- metal clamps become weapons when they fall from 16'. The number one rule on the building pad is if this thing starts falling, run away.


4.22.2015

Final Review

On Monday, April 20th 2015, our studio had our final review for our Green Oak Project of a design for a bunk house at Red Bird Mission in Clay County, Kentucky. Reviewers Kevin Stevens and Katherine Ambroziak from The University of Tennessee College of Architecture and Design, as well as Mark Sanderson, one of the Principals at DIGSAU architects in Philadelphia and Brian Court, a partner with Miller Hull Partnership in Seattle, gave us their time, experience, and expertise for a few hours. We presented them with twelve boards, a model, and physical 1:1 scale mockups explaining the work we have done this semester.


They reviewed our research and design and believe that the work we have done looks thorough, competent, and overall like a successful project. They gave us constructive criticism and advice ranging from specific construction methods to presenting alternative ways of thinking about architecture, design, and construction.

Our work this semester seems to have been successful. We still have some things to take care of concerning handing this project over to the next set of students so that they can actually build it. Building it will be the first true test, and then evaluating the building's sustainable design qualities and construction methods. It will take some time to truly validate our work, but we all believe that the work we have done will do some true good for the people of Clay County and for any designers who wish to use our research as a precedent for their own designs.

Winning Gold at University of Tennessee Knoxville EUReCA

At The University of Tennessee, Knoxville we have our annual Exhibition of Undergraduate Research and Creative Achievement. Even though we are still designing and our final review for this semester is less than a week away, we took the time to create a poster and give a presentation at the exhibit. This year the Green Oak Initiative won Gold in the Architecture and Design category. 

The exhibit showcased many projects and it was exciting seeing all of the work all these students have done and the potential that research projects can do for the world. Being recognized for the work that we have done this semester, as well as showcasing the work that students have done in the previous semesters, was wonderful. We are also glad we are spreading the word about the amazing work we are doing that we know will be doing some real good once we can utilize this material and construction methods.


4.04.2015

Penultimate Review

On Wednesday, April 1st we had our penultimate review.  Bill Martella, James Rose, and Matt Culver were our reviewers and gave us a great critique and great advice that we have already started to implement into our design.

This review covered the previous semester's work with green oak, the site and context, program, research, living building challenge, sustainable strategies, materials, details, and landscape. Having a team of 12 students and a knowledgeable, passionate professor has allowed us to get so much work done. The design is nearly finished and the construction drawings constructions specifications will be finished by our next review on the 20th of April.


3.25.2015

Exterior Mockup

We have one more building mockup completed!  This time we’re looking at how the green oak cants can be used as siding on a building.  With this 1:1 scale mockup, we’re investigating the weathering capabilities of 5/8” thick boards and the fasteners that are used to attach them.  This mockup will use stainless steel screws as well as typical woods screws to get a better idea how the acid in the oak will corrode the different metals.  We will evaluate the structure periodically to look at how ‘fissures’ or cracks may occur along the fastener point where the boards are pinned.

A roughly 4”x6” cant can be milled into 6 boards. We purchased ours cants from United Forrest Products in Morristown, Tennessee, they also milled them down for us.  The great folks were a big help in cutting a small order like ours (48 boards), I think they’re used to cutting quantities like 4,800!

The initial idea for this mockup was a 4x4x8’ box that would be clad in oak boards, using a pattern called reverse board and batten.  The box allows us to simulate the proper air space behind the boards that we would expect in the final project.  The air space is critical as this allows moisture to leave the boards easier after a rain. 


We re-purposed two floor panels that were used in the original green oak exhibit; those 2”x6”s frames are beefy!  


No, Oliver isn't parkouring, he’s fastening in a lot of extra cross bracing.  We decided to build most of the structure inside the Art + Architecture building for the ease of construction and access to the woodshop. It’s too bad that not all construction sites have air conditioning!


No this isn’t a port-a-john! It is the pre-oak-sided box frame being lowered with the help of a UT motorpool truck and its tremendously helpful lift gate.  Just the frame alone probably weighs a little more than three hundred pounds, didn’t I say those 2”x6”’s were beefy!  No problem with five architecture students eager to get their hands dirty! 
  
You can see the house wrap that covers the box.  This is because we wanted to be true to the wall design and prevent water from escaping into the plywood covered frame.  Those 2”x3”s and 2”x4’s you see are called furring strips, in our case, we over sided them to allow us hang the very heavy oak siding without concern.  


Hey it’s looking good!  We've got the boards spaced appropriately and Oliver is putting his finishing touches on the roof.  Why a roof?  Well, want to keep the inside dry.  


And it’s done!! Yes, it may look like an over glorified outhouse but we have bigger plans.  We expect to monitor this mockup over the next three months.  We’re happy to get it up this time in the year where it’ll be experiencing a wide range of temperature changes and precipitation. 

-Paul Attea