Our team studied different variations for a proposed house design. We integrated these projects into our Phase 2 proposal. Here are the three drawing sets that we brought to Washington DC:
Team A
Team B
Team C
5.06.2014
5.01.2014
Closer Look at our Final Board
If you did not get a chance to view our final presentation up close, here is another look at it. You may also download it here: Green Oak Presentation

4.29.2014
P3 Grant Award Winners
As you may or may not have heard, we are now the proud recipients of the EPA P3 Phase 2 grant! The whole team is brimming with excitement over our victory and cannot wait to see where the project takes us next! Not only did we win the Phase 2 grant, we took home a Student's Choice award; our fellow exhibitors voted and agreed we were worthy of taking home the prize! We are deeply honored and just want to say that every single booth that participated in the exposition did a knock-out job creating projects that benefitted People, Prosperity, and the Planet! We are all winners when it comes to improving the quality of life for everyone. One of the most exciting parts of the exposition was getting to talk to the students of different universities and share similar research stories and talk about what worked and what did not. All in all, we had an extremely successful semester and an invaluable exposition. Thank you to everyone involved at the EPA, the USA Science and Engineering festival, and everyone who proposed a project. Who knows, the next time we all meet up we may have built a Green Oak House!

4.26.2014
EPA P3 Expo
We have been judged completely and could not be more excited! We are still explaining our exhibit to the public and to returning judges! We love talking about Green Oak and educating everyone about the sustainability of this building material! Check our twitter for updates on our progress! @UTGreenOak


4.25.2014
Exposition Day
It is time. We have constructed the exibhit, hung drawings, placed models, tweaked our presentation and are ready for the judges! As excitement builds, crowds gather to talk about our G.O. House!

4.22.2014
Packed Up!
We are all packed and ready to hit the road for DC! Our bents and wall section mock-up fit in one van with the floor; all of our pallets and podium are in the other. Deconstruction only took a few hours with labeling and sorting the bolts and screws. DC here we come!

4.21.2014
So Close!
We have all of our exhibit material ready to build!

Our bents are up and we are planning out our boards and presentation.

Creating space to inhabit, our exhibit will showcase our projects intent. We chose green oak to build the bents so the public can see, feel, and experience our material up close and personal.

4.18.2014
Green Oak as Sculpture?
Meanwhile.. We have art! Well, what we are calling our "Green Oak Research Sculpture". Students are working with the Tennessee Center for Renewable Carbon and the UT Arboretum to develop this portion of our materials research. We have 15 pallets nine feet above ground that are subjects to measure dimensional movement, durability, and weathering qualities ( such as change in appearance). Students will monitor this project with photographic documentation once a month for the next 3 years to develop conclusions that can be applied to our future design/build/evaluate project.

4.11.2014
FabLab Progress Report
Excited about getting some build time in the Fab Lab, the team plans out a strategy for assembly. Pieces of pallets and green oak everywhere, we saw and screw the different pieces together to make a frame. It stands. The team glows as we have one more part of the exhibit put together!


We can definitely see our exhibit in the space with all of our other competitors and are ready to crush the competition!
3.12.2014
Gathering it all together


3.02.2014
Results with Sam
We were able to talk to Sam Mortimer from the New Norris Project who won the same EPA Grant a few years back. After contacting him by email a few times we were able to meet with him a few times and get some tips.
Meeting with Sam Mortimer – 03_02_14
Things that we need to consider or be able to answer:
Set up a strategy for presenting:
How many people at the booth at once?
Do we have one or two “know-it-alls”/”MCs” that can point certain questions to certain people?
What are people’s strong points?
Our main speakers need to be good at…
Being efficient.
Confident in answering.
If don’t know the answer, know the plan.
Show the WANT we have to build this structure.
“Can you build this with 90,000 dollars?”
“How will this educate people at different levels? How will this empower people at different levels?
- Building Industry
- Architects
- Communities
- Students
“How are you interacting with the groups you are working with? How are all the groups benefitting from this project?”
Understanding how this project EMPOWERS people.
Set our goals for Phase II.
How are we going to evaluate afterwards?
We should have a 1 minute speech, 5 minute speech, 20 minute speech.
Get on Archinect.
Meeting with Sam Mortimer – 02_28_14
Things that we need to consider or be able to answer:
Why does England use green oak? Because they have an abundance of resource, because of tradition, etc.?
Know our data – we know our idea, but we need to be able to throw out the numbers to back it up (and make that data easy to grasp, making the idea apparent)
How did we come to the conclusion of the prototype as the correct solution?
Be able to understand what design/build is.
With explaining design/build…
We know what we are doing.
Explaining the Fab Lab, and the resources our school has for a design/build.
What we are learning as architecture students.
Go over EPA stuff…
What are the goals of P3?
Why does this competition exist?
How can we have community engagement? Either engage before the competition, or have a plan for how we WILL engage the community with the project.
What will we do with the diorama after the competition?
Talk to _______ about Earth Day. – How can we get more involvement on campus?
2.26.2014
Ready for DC
The P3 Competition is starting to feel very real (and we're feeling pretty giddy) after a brainstorming session this past Sunday in the 65 degrees of Knoxville sunshine. Our team divided and conquered in a two group charrette to take on the challenge of "now just how ARE we going to present this stuff?" Ideas were bouncing off one another and onto our rolls of trace, documenting as much of the delivery as possible. Some ended up on the chalk board, some ended up cast aside in a crumpled mess--to be recycled of course. All in all we had a lot of success on narrowing in on a design, stay tuned to see what in store!

2.25.2014
EPA Grant from New Norris House
We contacted the team from the New Norris House to discuss different reactions and possibilities to apply to our Green Oak Seminar. Here is the conversation we had with Samuel Mortimer.
How well was the demonstration model received versus the board?
The model was received very, very well. I refuse to believe that only the time with the judges is important. I think it is pretty important to engage the public really well during your time on the mall. Big things we emphasized about the model were: 1. Proof we could build things cheaply and with craft; 2. It was to be used later on as a travel exhibit (one of the aims of p3 is educational as precedent and teaching tools); 3. As a tool to engage people (above all) in a 1:1 scale; 4. As a leadin to the designbuild nature of the project
The model was received very, very well. I refuse to believe that only the time with the judges is important. I think it is pretty important to engage the public really well during your time on the mall. Big things we emphasized about the model were: 1. Proof we could build things cheaply and with craft; 2. It was to be used later on as a travel exhibit (one of the aims of p3 is educational as precedent and teaching tools); 3. As a tool to engage people (above all) in a 1:1 scale; 4. As a leadin to the designbuild nature of the project
How did you get the demonstration model to DC? Was it built on site? Did it break down into smaller pieces?
The model was built in 6 floor pieces (think about the ice rink in market square), with several vertical elements placed strategically on top. The model was hauled for us by a driver from the TVA (a partner we made who gave us $5000 and use of their truck and a driver for the trip.
The model was built in 6 floor pieces (think about the ice rink in market square), with several vertical elements placed strategically on top. The model was hauled for us by a driver from the TVA (a partner we made who gave us $5000 and use of their truck and a driver for the trip.
Were you allowed to have smaller articles as selling points? (Pamphlets? Brochures? Etc.)
We made some postcard sized handouts. Some people have take home things (keychains, and the like… think solar decathlon), but I don’t think that’s a good use of your time or money. We also had a few smaller scale models that went on the table in front of our boards. Material samples or other things people can touch.
We made some postcard sized handouts. Some people have take home things (keychains, and the like… think solar decathlon), but I don’t think that’s a good use of your time or money. We also had a few smaller scale models that went on the table in front of our boards. Material samples or other things people can touch.
Do you give the judges any kind of paperwork or brochure or is it purely by talking and the board?
We spoke a little bit at the boards, but spent most of the time in the demonstration model. We gave them our postcard handout, but otherwise I think that was it.
We spoke a little bit at the boards, but spent most of the time in the demonstration model. We gave them our postcard handout, but otherwise I think that was it.
How strict were the constraints on the board design? Did you have to put in certain graphics?
We struggled with this at first and looked at modifying the boards with photoshop filters, etc (that strange colorful nautilus). In the end we didn’t do this. The board design is quite important to convey a clear message. Don’t put too much importance on setting yourself apart and concentrate on having a well laid out presentation. Your boards will likely look significantly different that most other people there anyway… so no need to try too hard and muddy up the message. Look at photos from years passed at other peoples boards. They are sciency, have no sense of heirarchy, and are generally a design nightmare. Make your boards look like Edward Tutfe working for National Geographic.
We struggled with this at first and looked at modifying the boards with photoshop filters, etc (that strange colorful nautilus). In the end we didn’t do this. The board design is quite important to convey a clear message. Don’t put too much importance on setting yourself apart and concentrate on having a well laid out presentation. Your boards will likely look significantly different that most other people there anyway… so no need to try too hard and muddy up the message. Look at photos from years passed at other peoples boards. They are sciency, have no sense of heirarchy, and are generally a design nightmare. Make your boards look like Edward Tutfe working for National Geographic.
That being said, I’m not sure if we followed the font suggestion or not. All the indesign files are on the server for you to reference if you like.
If you could have done anything different, what would it be? (and maybe nothing, because you guys won :)
Beginning of the project was a little overwhelming even with only a few people at times. Once the project became more “set” it was easier to function behind one common goal… but identifying that goal in the first place was difficult and engaged people in a lot of different ways (mostly resulting in a handful of inactive participants at times – both mentally and physically). I’m not sure exactly what I would do, but I would find a way to make sure everyone was pulling a rope of their own (but in generally the same direction) from much earlier on. Does that make sense? Not always possible, but we could have done better. It’s an issue of ownership (mostly) related to group projects that isn’t unique to p3 by any means. This isn’t just a matter of being better suited to win the content, but fundamentally about ensuring everyone is learning. (Though that isn’t necessarily up to you I suppose, so just concentrate on winning!)
Beginning of the project was a little overwhelming even with only a few people at times. Once the project became more “set” it was easier to function behind one common goal… but identifying that goal in the first place was difficult and engaged people in a lot of different ways (mostly resulting in a handful of inactive participants at times – both mentally and physically). I’m not sure exactly what I would do, but I would find a way to make sure everyone was pulling a rope of their own (but in generally the same direction) from much earlier on. Does that make sense? Not always possible, but we could have done better. It’s an issue of ownership (mostly) related to group projects that isn’t unique to p3 by any means. This isn’t just a matter of being better suited to win the content, but fundamentally about ensuring everyone is learning. (Though that isn’t necessarily up to you I suppose, so just concentrate on winning!)
Lastly, how many people went? Was there a limit? Was it just whoever could make it got to go or did you select the students who went?
We brought 2 architecture students and 5 (or 4?) planning students, plus 4 faculty members. There was no limit, except the budget (this was all of the people working on the project at the time though). I think with some clever transport (megabus!) and carpooling, you could likely all go… but you know the project and team better than me! How you delegate responsibilities within your presentation (both for judges and public) is a pretty important exercise. Who knows what things best and who is the best at talking about them. It’s not always the same person.
We brought 2 architecture students and 5 (or 4?) planning students, plus 4 faculty members. There was no limit, except the budget (this was all of the people working on the project at the time though). I think with some clever transport (megabus!) and carpooling, you could likely all go… but you know the project and team better than me! How you delegate responsibilities within your presentation (both for judges and public) is a pretty important exercise. Who knows what things best and who is the best at talking about them. It’s not always the same person.
Whew. Sorry -- that is what we are trying to figure out right now.
2.19.2014
Narrowing our Focus
Designing the connections for our bent was a challenge but with numerous iterations of sketches and a compilation of ideas, we finally hammered out the ideal connections we would like to build.

 |
| Here the whole class is talking about graphics for the final presentation board |
 |
| Paul is explaining a previous grant project board and talking about what we could pull to use for our own |
2.13.2014
FabLab Certification
The old faces had already been certified to work in the FabLab but for the 5 new faces, we had to have Matt Culver show us the machinery and explain how it works before we could use it. We watched and even cut and planed a few pieces. We are all now caught up and able to construct using the FabLab.


The FabLab is a warehouse but the office and meeting areas are very nice.
2.11.2014
Designing Structure
Over the past four weeks Team Structures has been brainstorming possible building strategies for our green oak pallet cants. They have considered things such as traditional heavy timber methods, engineered fastening techniques, and everything in between. A meeting was held this past Thursday between two professors in the Engineering Department, Dr. Retherford and Dr. Bennett, to discuss three possible building strategies. Most of the topics discussed revolved around spanning capabilities of the oak beams. Our proposed schemes are based on prefabricated methods to help ease the cost of construction as well as material efficiency. Because the methods proposed were more unconventional, our team was a bit skeptical as to how well they would be received by our structural experts, but we are glad to report that the preliminary discussion was a very positive one. Our Green Oak Initiative team is very excited about this step, it seems to give us a solid lead on a potential candidate to demonstrate at D.C!


2.09.2014
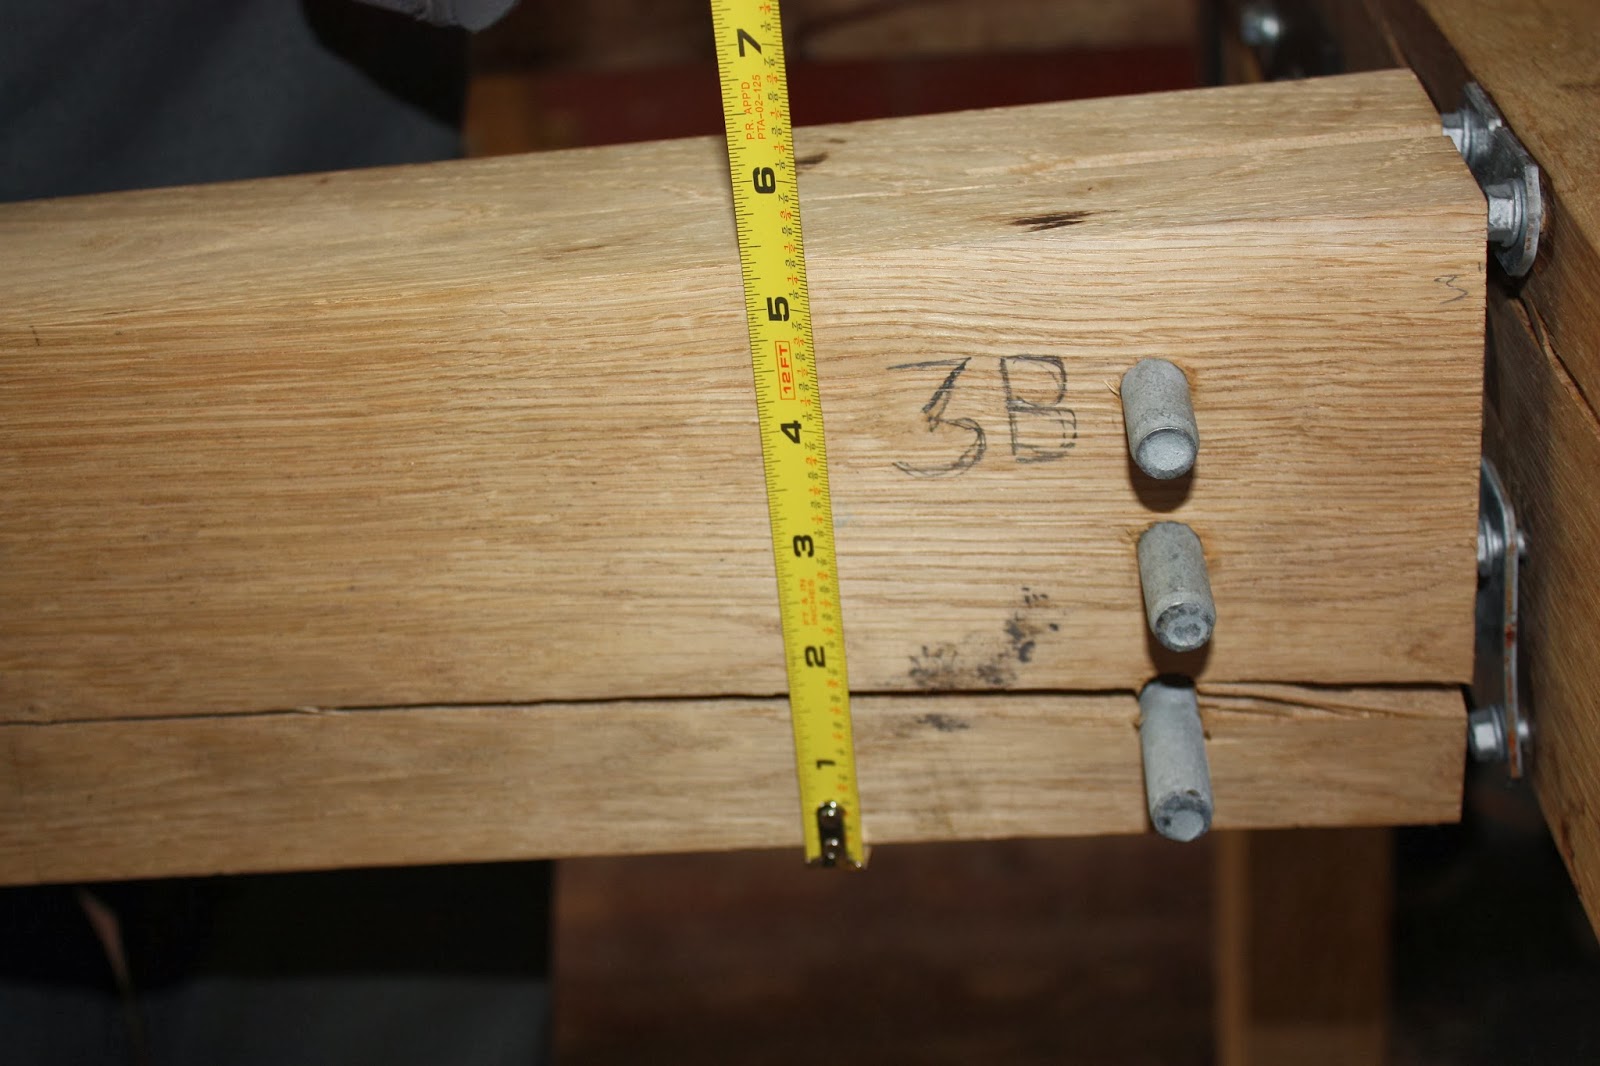
Simpson Frame
The other type of connection we used for constructing the green oak frame utilized Simpson connection straps and bolts.
Fabrication: Preparing the green oak members for assembly was easier using a standard metal strap, such as Simpson Strong-Ties. Due to time limitations with the shipping of hardware, we chose to fabricate our own metal straps. This fabrication method can easily be accomplished with standard tools, such as circular saws and drills, because all oak members meet with a flush butt connection. It would be very possible to fabricate and assemble on site. The only problems we ran across in this process was the gumming up of drill bits due to the moisture content of the wood; we were however, still able to efficiently mill down the oak members and set in pilot holes using the metal straps as a template.
Construction: With all the oak members ready and labeled, the assembly of the frames was a simple and efficient process. The biggest hurdle we faced was the physical demand of working with such a heavy material. We discovered that the wood is much heavier when green than typical kiln dried or seasoned timbers. We were able to assemble the two bends of the frame on the ground, raise them up on the cart, and attach the connecting joists and ridge beam. The job definitely required multiple sets of hands in order to hold the frame upright and attach the final connections. Although it was a taxing experience, we were able to refine our method of assembly and envision how, through the use of bracing and cranes, a larger frame could be constructed on site. Prefabrication was also a viable option.
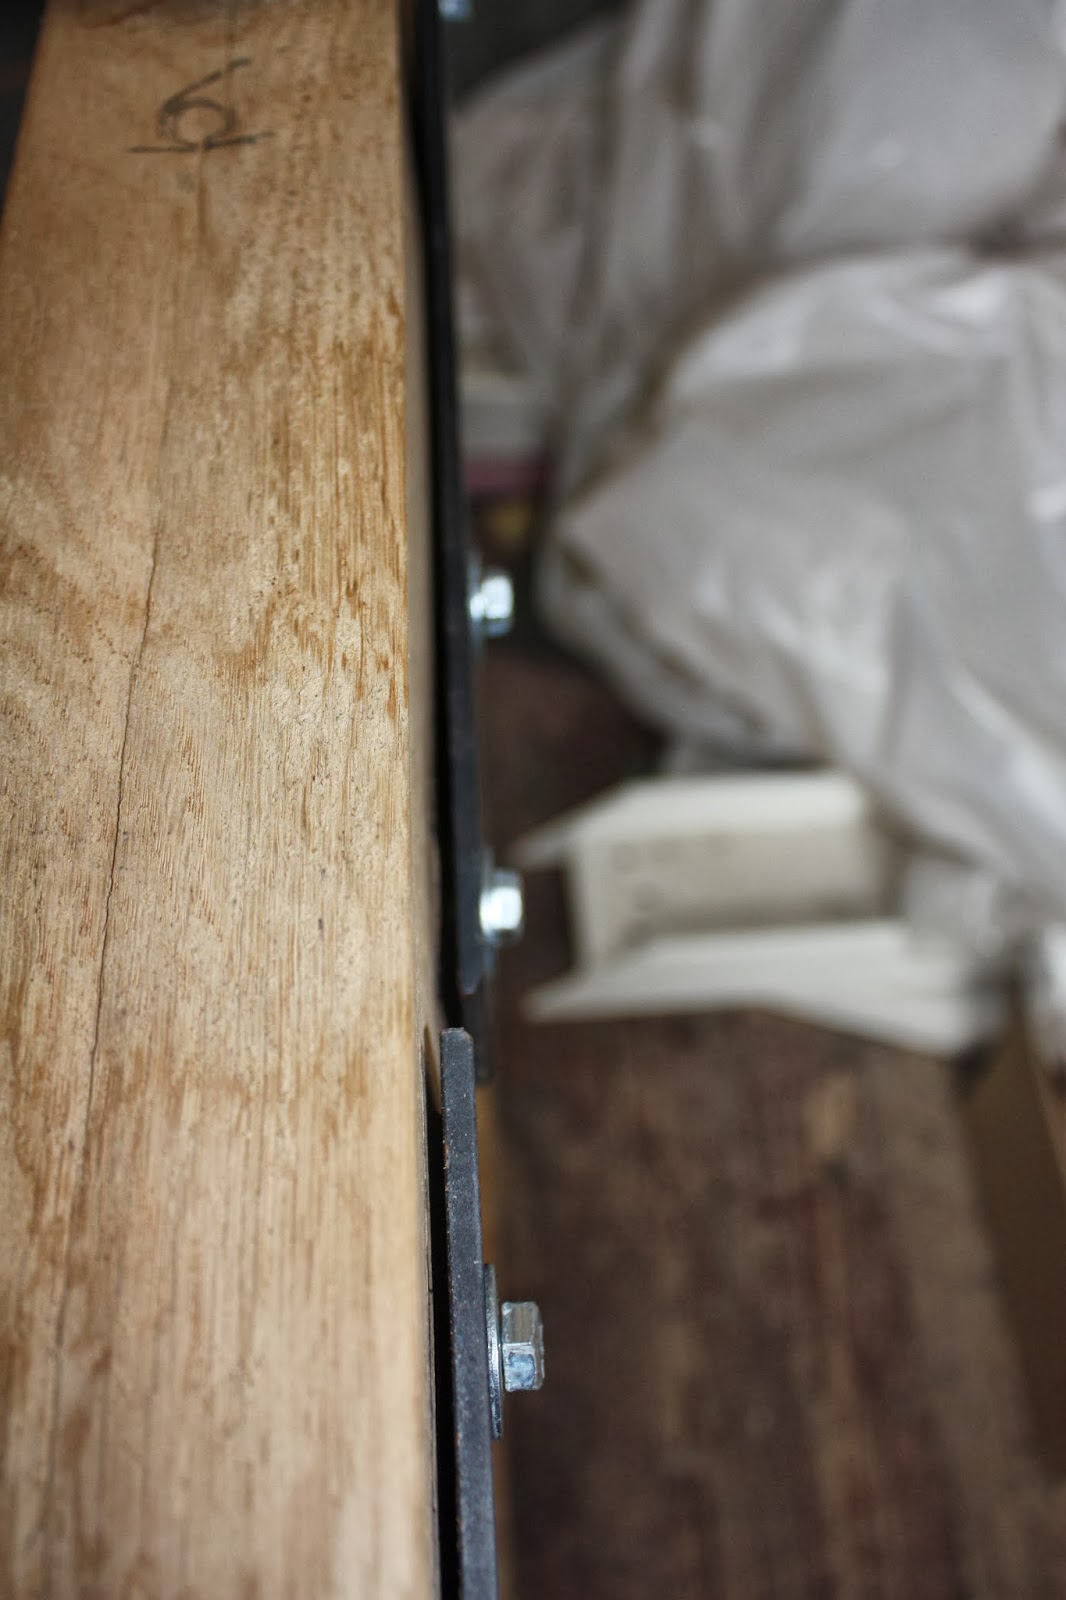
Post-observations: After the frame was kiln dried for a month it showed many signs of distortion; This proved to be problematic in combination with the metal strap connections. The radial and tangential shrinkage of the wood was significant. Dropping from 3" x 5.5" to approximately 2.75" x 5.25", the oak shrank up to a quarter of an inch. This led to the wood actually shrinking away from the screws causing the metal plates to pull away from the wood. These simple joint connections were pulled apart due to the shrinkage that caused the joists to move. We had to use a concealed joist tie that set into the center of the oak member. The massive metal dowels created weakness in the smaller sections of the oak member and created a large check along the entire side of the joist. Since we were forced to rapidly dry the frame as a simulation, we were not able to see how the frame would have performed if the connections were maintained and tightened throughout the drying process. We concluded that due to the way the screws reacted to the shrinkage of the wood, strap connections can work but are not optimal when working with green oak construction drying in a kiln.


 |
| You can see the gap between the plate and the wood |
 |
| The shrinkage was so drastic you could fit a pencil inside |
 |
| This check may have been due to the pins |
 |
| More shrinkage and movement |
 |
| You can see the bowing on the beam |
 |
| Checks down the side of the column |
Subscribe to:
Posts (Atom)